Original Link: https://www.anandtech.com/show/572
![]() PC
users approach “value” products with different expectations in mind. Your normal
PC user will see a “value” CPU as something that they can afford but won’t perform
as well as a more expensive unit. However, your average AnandTech reader sees
a “value” CPU as a true value only if it can be overclocked to the point where
it can compete with a much higher performing and much more expensive processor.
The same holds true for video cards but unfortunately, until recent times, there
have been very few instances in which a video card that has been targeted at
the value market segment has been able to perform as well as some of the higher
performing and more expensive cards when overclocked.
PC
users approach “value” products with different expectations in mind. Your normal
PC user will see a “value” CPU as something that they can afford but won’t perform
as well as a more expensive unit. However, your average AnandTech reader sees
a “value” CPU as a true value only if it can be overclocked to the point where
it can compete with a much higher performing and much more expensive processor.
The same holds true for video cards but unfortunately, until recent times, there
have been very few instances in which a video card that has been targeted at
the value market segment has been able to perform as well as some of the higher
performing and more expensive cards when overclocked.
There have been a handful of value cards that have ended up performing quite respectably in the past when overclocked. Towards the end of 1999 we took a look at 3dfx’s Velocity 100, which was basically a crippled Voodoo3 with only one texture unit (TMU) enabled. However, with a few registry tweaks we were able to remove the crippling factor by re-enabling the second TMU, thus bringing the performance of this sub $50 card up to the level of the Voodoo3 2000 in many cases.
Unfortunately, successes like the Velocity 100 were very limited for the most part and we were never really able to find what would be the Celeron or Duron of video cards, a really cheap graphics card that could be overclocked to the point where it would be competing with products of a much more expensive class.
The latest candidate for the title of the Celeron/Duron of video cards is NVIDIA’s recently released GeForce2 MX. Weighing in at a light $119, the GeForce2 MX already meets the first requirement for the most bang for your buck overclocker - it’s cheap. The next step is to see whether or not it can overclock, and following that, does overclocking the card actually help increase performance by any noticeable amount?
Does the GeForce2 MX meet the rest of the requirements? Obviously, as otherwise there wouldn’t be much of a purpose to this article, but let’s see exactly how well it performs and just how fast we can get this stealthy $119 rocket to go.
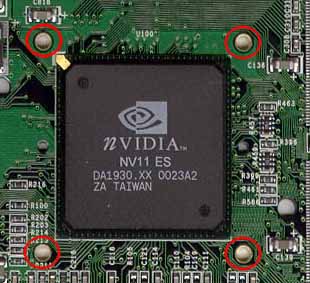
The GeForce2 MX GPU
 As
you will recall from our GeForce2 MX Review,
the chip itself is a 0.18-micron solution based very closely upon the GeForce2
GTS design. The only differences are that the GeForce2 MX features a 175MHz
clock speed and only features two rendering pipelines while the GeForce2 GTS
has a total of four.
As
you will recall from our GeForce2 MX Review,
the chip itself is a 0.18-micron solution based very closely upon the GeForce2
GTS design. The only differences are that the GeForce2 MX features a 175MHz
clock speed and only features two rendering pipelines while the GeForce2 GTS
has a total of four.
Since the GeForce2 MX is based on the same 0.18-micron process as its older brother, it should be able to reach approximately the same core clock speed as the GeForce2 GTS, which by default ships at 200MHz. When we investigated overclocking on the GeForce2 GTS, we noticed that the highest core clock speed we could achieve was approximately 240MHz so it makes sense that the GeForce2 MX core should be able to hit at least 200MHz (GeForce2 GTS core clock) and potentially up to 240MHz (maximum GeForce2 GTS overclock).
The potential for the GeForce2 MX to hit even higher clock speeds is there because the MX isn’t quite as complicated as the GeForce2 GTS. We just mentioned that the MX only has 2 rendering pipelines versus the 4 on the GTS; fewer rendering pipelines translates into less work done per clock, which in turn means less heat produced, which definitely comes in handy when overclocking. While most GeForce2 GTS cards we’ve tested have been able to hit around 230MHz core, the potential for the GeForce2 MX could be higher as it is a less complex GPU when compared to the GTS.
One thing that you have to remember though is that, since the GeForce2 MX is only rated for operation at 175MHz, most manufacturers won’t be using any passive cooling much less any active cooling on their MX boards, meaning no heatsinks and definitely no fans. This is going to throw a bit of a wrench in our plans for overclocking the GeForce2 MX since the core is obviously only going to allow itself to be pushed so far before the lack of a heatsink/fan is going to become a limitation.
The easiest way to get around this limitation is to simply apply a bit of thermal compound to the surface of the GeForce2 MX chip and mount a heatsink or heatsink/fan combo such as one you would find on an old TNT or TNT2. You could always pull one off of a GeForce or a GeForce2 GTS but chances are that you would rather stick with one of the latter rather than attempt to overclock a GeForce2 MX. Most MX boards will probably have the heatsink mounts from your regular GeForce2 GTS board as seen below, so you could use those to your advantage as well:
Be careful if you’re using a fan from a TNT2 or any other video card because they will most likely feature a small two or three pin power connector that probably won’t be present on your GeForce2 MX board. A way around this is to simply use the heatsink from another video card and use an old 486 fan or anything else that can mount onto the heatsink.
Our reference GeForce2 MX board had no problem maxing out the overclocking slider in NVIDIA’s control panel at 220MHz, although in order to do that we had to mount a heatsink/fan we took from the Absolute Multimedia GeForce 256 card on the MX itself. With a heatsink/fan, most GeForce2 MX chips shouldn’t have a problem hitting 200MHz. Some could get lucky and may be able to hit 200MHz without a heatsink/fan but we’d recommend using at least a heatsink. We could actually run our reference board at 200MHz core without a heatsink/fan in a Quake III Arena demo loop without any problems, but at 220MHz things began to get flaky without a heatsink/fan.
The Memory Clock
Memory bandwidth has always been a limiting factor for NVIDIA’s graphics cards. The problem became very noticeable with the introduction of the GeForce 256 equipped with DDR SDRAM and the incredible performance improvement it offered over the same setup using SDR SDRAM. As we mentioned in our GeForce2 MX Review, the GeForce2 MX is memory bandwidth limited far before it ever reaches its fill rate limitation.
What this means is that while the GeForce2 MX may have a very flexible core when it comes to overclocking that won’t matter much at all since its performance is primarily limited by memory bandwidth. So how can you increase memory bandwidth? By overclocking the memory of course.
The default memory clock of the GeForce2 MX is 166MHz, this means that 6ns SDRAM is enough for a manufacturer to hit that 166MHz clock. And while the original GeForce had the same memory clock, it is more likely that we will see 6ns on MX cards whereas most GeForce (SDR) cards actually shipped with 5.5ns SDRAM, which is rated at 183MHz. With 6ns SDRAM, things become increasingly difficult when it comes to overclocking the memory, especially if you want to get a much higher clock frequency out of the chips.
Unlike pushing the GeForce2 MX’s core, you cannot simply tack a heatsink on your memory and expect it to be able to overclock an additional 15%. While we have even seen companies attempt to use RAM heatsinks as an overclocking tool, the nature of today’s SDRAM as a device that works much like a capacitor prevents heat from being the primary limitation when it comes to overclocking potential.
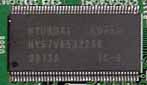 Our
reference design GeForce2 MX board came equipped with 32MB of 6ns Hyundai SDRAM
(166MHz), but if you’ll remember back to our TNT2 days as well as the SDR GeForce
days, which weren’t too long ago, Hyundai SDRAM has always been a wonderful
overclocker. Their 6ns chips were used on the Hercules Dynamite TNT2 and we
managed to get those up to 190MHz and the chips on our reference MX board hit
210MHz fairly reliably.
Our
reference design GeForce2 MX board came equipped with 32MB of 6ns Hyundai SDRAM
(166MHz), but if you’ll remember back to our TNT2 days as well as the SDR GeForce
days, which weren’t too long ago, Hyundai SDRAM has always been a wonderful
overclocker. Their 6ns chips were used on the Hercules Dynamite TNT2 and we
managed to get those up to 190MHz and the chips on our reference MX board hit
210MHz fairly reliably.
Overclocking a Video Card
Taken from Overclocking the GeForce2 GTS Review
Common wisdom has taught us that there is one goal to overclocking a video card: find the highest core and memory speed combination that a card will handle while remaining stable, and overclock the card to this amount. For the vast majority of video cards we have seen that heat is the largest limiting factor in maximum core clock speed. When the GeForce 256 was overclocked from its stock core speed of 120 MHz to 160 MHz, the cards usually began to fail around this speed simply because the chip was getting too hot. This is the reason that extreme cooling measures, such as those employed on the Leadtek WinFast GeForce DDR Revision B prove to be so effective. When the GeForce 256 GPU was overclocked higher than this amount, we began to see image issues associated with chip heat. A common example of such an issue is a blocky flickering on the rendered scene followed by a system crash. When such artifacts are seen, beware of heat damage to the chip. Below we show a screen shot of a common place we normally see these artifacts when in Quake III Arena, the player's face rendered in the bottom middle of the screen. It is hard to see the triangular area on the right side of the face that has been rendered improperly, but careful examination will reveal the flaw. While it may seem trivial in in this screen shot, the problem is greatly magnified when 60 FPS of this picture are being molested by the overly fast core speed. A properly rendered face is shown to the left with a green background. The blocky image lies to the right and is in black.
 |
|
|
|
A
properly rendered face.
|
A face with image problems on the right side due to excessive core speed. Note the blocky triangle. |

Maximum memory clock speed, on the other hand, is usually attributed to transistor conductivity, an aspect that is a function of the ratio between the transistor length and width. Rather than being plagued by heat problems, memory chips usually hit a point where the transistors inside the chip can no longer operate at such a high frequency. The fabrication process of chips results in variations in both transistor length and width, thus the maximum overclocked speed is a function of this process. The problem is that neither the manufacturers nor the consumer can tell which chips have maximum transistor conductivity. Some chips may be of the highest 'quality' and are able to reach speeds well over those speced. Other chips may not be able to operate much above the speed that they are speced for. The speced speed usually is denoted by the minimum speed that the chip will be able to operate at. When the RAM chips are pushed beyond the limit by overclocking the memory clock, the image being rendered often has small flakes in it or improper colors (yes, we have even seen Quake 3 levels in rainbow colors) and crashes are not unlikely. Image quality problems such as these are most often attributed to excess memory clock speed and are easily repaired by clocking down the memory clock. Below is a Quake 3 Arena scene that has image artifacts due to excessive memory speed. Note the snow-like effects. While the bad pixels on the screen may not seem overwhelming, when the game is being played at 60 FPS and these dots are constantly changing position, it looks like snow is falling. The artifacts may be hard to see in the small version below, but enlarging the image will reveal the problem of an overly high memory clock.

The transistor conductivity problems are also present in the processor core itself. When heat does not play a role, the transistor conductivity (often referred to as chip "quality") takes over. Processor production produces variations in transistor length and width in the same way that memory production varies these two. When transistor conductivity (chip "quality") is not favorable in the GPU, similar symptoms to heat failure are observed. The only difference in this case is that the card is much more likely to crash without any warnings or artifacts.
Due to the variations in transistor conductivity, for the most part, each video card processor and memory will overclock differently. There is no way to ensure that a particular card will go x amount above its default speed, however some speed increases have become almost common place (for example at least 10 MHz on the core of the GeForce 256). Therefore, let it be stated that your individual results may vary. In addition, overclocking has the potential to damage either the memory or the video processor (depending on which component is overclocked too high). Things to watch out for are the artifacts mentioned above, as these are sure signs that you need to slow down. Some panic when even a small speck appears on the screen. Do not fret, simply exit the program, reboot the machine and try again. Do not worry if the screen becomes filled with artifacts or the computer crashes: odds are very good that no permanent damage has been done to the card. Trust us, we have pushed cards to the limit and back and we have yet to kill a GeForce 256, GeForce2 MX or GeForce2 GTS based card by overclocking it too much. Even if the memory or processor is not harmed while finding what overclocked setting is best for you, running at overclocked speeds has been known to reduce the life of the card because, when overclocked, transistors die at a faster rate than when not being pushed.
Overclocking the GeForce2 MX
Taken from Overclocking the GeForce2 GTS Review
By now you’ve probably heard of NVIDIA’s ‘CoolBits’ overclocking switch in the registry to enable their overclocking utility. Like every other company, NVIDIA doesn’t officially support overclocking their cards, but they do provide us with this “hidden” (obviously not very well) utility that allows us to do just that. Here’s how you enable it:
To gain access to core and memory overclocking utilities, simply run Window's registry editor (regedit) and perform the following steps:
1. Open the key, [HKEY_LOCAL_MACHINE\Software\NVIDIA
Corporation\Global\] by navigating down to it in the left hand pane.
2. Add a new key named "NVTweak".
3. Go under this new key and add a new DWORD value with the name "CoolBits".
4. Double click on CoolBits in the right hand pane and set the value to 3 with
a hexadecimal base.
5. Reboot.
A screen shot of what your registry should look like is given below:
After performing these steps, an overclocking screen will be available under the additional properties of your video card. First you must enable overclocking by clicking on the "enable" check box. After a reboot, you should be up and ready to overclock. Before enabling the core and memory speeds you select, the utility will "test" the configuration. What it does during this process is beyond us, as we have yet to seen any speeds "fail" this test, however you can not use the new settings until they are tested. It is best to check the box which enables the new settings to be applied at startup as the program seems to work best if the computer is rebooted between each overclock. Below is a screen shot of exactly what this utility looks like.
So now that we know how to overclock the GeForce2 MX, let's actually get down to the dirty business and fulfill our need for speed.
Overclocking the Core
Simply pushing the core of the GeForce2 MX from its default 175MHz clock to the furthest the 'Coolbits' overclocking slider would go at 225MHz didn't yield much of a performance improvement at all. At 1024 x 768 x 16 all the way up to 1600 x 1200 the 29% increase in core clock speed only resulted in about a 3 - 4% increase in frame rate. And in order to reach 225MHz we had to use a heatsink on the actual GeForce2 MX chip itself. Obviously not worth the effort there, and another indication that the GeForce2 MX is clearly memory bandwidth limited and not fill rate limited.

The performance improvement gained from increasing the core clock of the GeForce2 MX when dealing with 32-bit color solutions is nonexistent. If you're lucky you may gain an extra tenth of a frame, the move to 32-bit color puts the strain on the GeForce2 MX's 166MHz SDR SDRAM and renders the increase in fill rate you gain by overclocking the core useless.
Overclocking the Memory

Things are finally beginning to seem a bit more useful. Our Hyundai 6ns SDRAM was able to hit 210MHz pretty reliably. The 27% increase in memory clock yielded quite a noticeable improvement at 1024 x 768 all the way up to 1600 x 1200 in 16-bit color. While it's obvious that simply increasing the memory clock to 210MHz isn't curing the MX of its memory bandwidth bottleneck, at 1024 x 768 we see a 12% improvement in performance which isn't bad at all.
You get much more bang for your overclocking buck under 32-bit color. Once again, we're increasing the memory clock from 166MHz to 210MHz, an increase of 27%, and at 1024 x 768 x 32 we get a 27% increase in performance which translates into a 1% increase in performance for every 1MHz you overclock the memory clock on the GeForce2 MX. Can you see how badly the GeForce2 MX wants a faster memory clock?
Overclocking the GeForce2 MX
As we discovered in our Overclocking the GeForce2 GTS review, when pushing the core and memory clock together you can never reach the same overclocking levels as you can if you're just increasing one or the other. For example, while we were able to overclock the core of our GeForce2 MX reference board to 225MHz alone, we could only push it to 220MHz when overclocking the memory to 210MHz as well.
Since we have just proved that the greatest performance increase comes from overclocking the memory of the GeForce2 MX, the best way to approach overclocking the MX is to overclock the memory as high as it can go, and then increase the core clock as high as it can go afterwards. This makes sure that you get the most performance out of your setup. How fast does this make the GeForce2 MX? Let's have a quick look:
Overclocking the core alone yielded a 4% increase while pushing the memory itself gave us another 12%, and doing both together left us with almost a 20% higher frame rate at 1024 x 768 x 16.

Increasing the core clock in addition to the memory clock helps push the performance improvement at 1024 x 768 x 32 close to 30% but the majority of that increase still comes from boosting the memory clock.
Performance Conclusion
What's the result of all of this work? Let's take our newly overclocked GeForce2 MX and see how it stacks up to the competition:
At 640 x 480 the performance of our overclocked MX was slightly faster than the stock card, but you can immediately notice a performance difference at 640 x 480 x 32.
The GeForce2 MX actually came out faster than our stock speed GeForce2 GTS at 800 x 600 x 16, but the most impressive thing is that the overclock also gave us an increase of about 17 fps in 800 x 600 x 32. This puts the MX noticeably faster than a GeForce SDR but a few frames slower than a DDR GeForce.
At 1024 x 768 the overclocked MX is still the second fastest thing on the chart in 16-bit color and in 32-bit color it is about 9 fps slower than the GeForce DDR but noticeably faster than the SDR GeForce. At $119, if you can manage to overclock the memory high enough, the GeForce2 MX is quite a killer.
Conclusion
We already knew that the GeForce2 MX was a value at $119, but if you can manage to overclock the memory to around 200MHz it becomes a much more powerful solution and definitely something you'll want in your system.
We've spent the past few months drooling over new motherboards that set us back at least $150, 1GHz Pentium IIIs and Athlons that we all wanted but couldn't really justify spending $1,000 on as well as $300 video cards that made the frames fly but the credit cards heavy with debt.
Recently that has been changing, the "value" market as most AnandTech readers see it has been becoming even more attractive. At first with the 566MHz Celerons that would overclock to 850MHz and beyond and now with the Duron that offers an Athlon level of performance at a little over $100. We can safely add NVIDIA's GeForce2 MX to that list.
If manufacturers deliver these boards at $119 and we can get some decent SDRAM on them we may have much more than a Hot Deal on our hands.


